Sunday, March 29, 2009

Biodiversity Baking's first photoshoot

We are updating Biodiversity Herbs and Baking Supplies's Website http://www.biodiversityherbs.com/ to give all of our customers a better shopping experience. We have teamed up with a talented Seattle photographer, Grace at I-Candi Studios http://www.candistudios.com/ for the photoshoot.

The new pictures are coming soon, and we can't wait to share them with you.

In the meantime, here is a sneak peak from the photoshoot from this past weekend.

Welcome! It is now 11:30 am on Saturday, and this is BioDiversity Herbs and Baking Supplies first product and food photoshoot! I am so excited.

Location: I-Candi Studios in Seattle, WA. What a hip and beautiful studio. I love it!

All of our products and the beautiful foods I made with them lined up on the counter, waiting for their turns to be photographed.

Hey, the photographer is at work. Let's take a look...

Our talented photographer, Grace, hard at work.

Photography 101- Lights! Then camera! It is really amazing how much your eyes compensate for what you see and what is actually there. The fundamental ingredient of good photography is good lighting. Grace uses a light meter to get the lighting just right.

Me, assisting the photographer and giving my two cents opinion on "artistic direction". I left most of that work to the photographer. She is the professional. I am the baker.

Sneaking a peak..... (To be revealed later this week, I love professional photography!)

And, that's a wrap! Biodiversity has officially completed our first product shoot. I have learned a lot from the experience and welcome you to enjoy them as well soon.

Sincerely,

Julie


Sunday, March 22, 2009

Steamed Yam/ Taro Cake (Yu Tou Gao)

When I was growing up, my mom made (and still makes) the best yam cake. For me, it is the ultimate comfort food. I decided to make this today because I have on hand good quality Chinese sausage from Teck Sang in Singapore http://www.tecksang.com/ (My parents bought it for me on their last trip to Seattle). The Chinese sausage lends a sweet and pungent flavor, kind of like a Chardonnay that has been opened for a day. All the ingredients get embedded in the rice flour, the key ingredient- the taro, embarks a light purplish tint that is both beautiful and elegant. When the cake has cooled down, it can also be lightly pan fried. Served with chili sauce, this version beats the ones you order at Dim Sum restaurants any day. It is also healthier and you actually taste the taro.

Here's my mom's recipe. Thanks to my dad for compiling this! Thanks DAD!

Ingredients:
(A) Chinese Sausage 100 g
Dried Shitake Mushroom 5 pieces (Medium)
Dried Shrimp 10 g
(B) Yam/Taro 500 g (diced)
Rice Flour 600 g

(Seasoning)
Salt 2 tsp
Pepper 1/2 tsp
Fine sugar 1 tbsp
Rice Wine (1 tsp, optional)
Black soy sauce 1 tsp

(For Topping)
Red Shallots
Chives/Green Onions

Method:

1) Add 2 tbsp of vegetable oil in a wok and saute the dried shrimp and Chinese sausage first. Add taro and mushrooms and stir fry until fragrant.


2) In a separate bowl, add 1800 ml of cold water to the flour. (This step is the secret to making the cake smooth and creamy). Work out all lumps until the flour is completely dissolved in the water.

3) Add the liquefied flour into ingredients in the wok and stir evenly until it forms a smooth sticky paste.

4) Scoop this content into a steamer, pat down with a spoon and steam for 30 mins.
5) Slice shallot thinly and fry it in hot oil. (Be sure to blot the shallot dry before frying, otherwise the shallots would be crispy).
6) Add the fried shallots to the top of the yam cake and garnish with chives.
7) Slice up the cake and serve hot with a side of chili sauce.


I hope you enjoy this recipe!

Sunday, March 15, 2009

Tomato in Sesame Sauce (Gomadare)

Xi Yan is a famous restaurant in Singapore. They are a private dining facility, and it is quite hard to get a reservation. You must have at least a party of six and a minimum of three hours to spare to sample the banquet. Check it out when you are in Singapore: http://www.xiyan.com.sg/

In the meantime, since I am now living in Seattle, I have not had the chance to visit. One of their famous "Zhao Ba Cai" (Signature dish) is Tomatoes dressed in Sesame Sauce. It is delicious, healthy and makes a wonderful presentation when entertaining. Here, I share with you my version of this beautifully simple dish. This dish is also a hit during Chinese New Year because the final presentation of the tomato makes it resembles a beautiful orange, which symbolizes prosperity and wealth for the new year.

Gomadare Sesame Sauce Dressing:
4 tablespoons of sesame seeds
1 teaspoon soy sauce
1/2 teaspoon ponzu juice
1/2 tablespoon mirin
1 tablespoon of dashi (200 g Bonito Flakes and a 1 x 1 inch of kombu in 2 cups of water. Boil until the bonito flakes sink to the bottom, about 3-5 mins.)
1/2 teaspoon mayonnaise (optional)

1) Toast the sesame seeds in a pan until they turn slightly dark brown.
2) Grind the sesame seeds in a coffee grinder until the seeds are broken down and relatively smooth. (You can use a suribachi (Japanese mortar) for this, but I am taking a short cut here.)
3) Add 2 tablespoon of ground sesame into a suribachi, add dashi, mirin and soy sauce and start grinding into a paste. (This step is a lot easiler because I used the coffee grinder in step 2).
4) Add ponzu juice and mayonnaise to finish off the paste.
5) Feel free to experiment! Adding some more dashi will thin out the sauce, but I prefer my gomadare to be thicker and have more body.


Tomatoes:
3 Organic Tomatoes (Or however many you wish to serve, but the recipe was written for 3 tomatoes, so adjust accordingly)
Mint leaves (for garnish)

1) Drop the tomatoes in boiling water for 30 seconds. Take them out immediately or they will be overcooked.
2) Dip the tomatoes in a cold, ice water bath immediately. Let them rest for 5 mins.
3) Peel off the outer skin. (The skin should come off easily after the cold water bath).
4) Score the tomatoes on the sides (4 wedges). Do not go too deep, the tomato should still be whole.

Putting it together:
1) Spoon about 1 teaspoon of the Gomadare sauce directly on top of the tomato and let it drizzle down the side.
2) Garnish with a mint leaf.
3) Serve.


Sunday, March 8, 2009

Mickey Mouse Pancakes

When I was a kid, my mom cooked us delicious meals served on stainless steel plates. My sister and I would always joke about how this plating style resembled the way prisons or army barracks would serve food. It wasn't until later that I would realize the benefits of stainless steel as one of the most inert and safest materials used for food contact. Mommy really does know best. Later, when I first started working, I couldn't understand why wines needed to be decanted into a beautiful crystal vessel. In my younger days I quipped in front of everybody, "Why can't you just decant wine using a bucket or something?" To this the reply was, "Because it wouldn't be the most refined…" What a pretentious prick, I puffed.

I have never been the one to plate or make food look nice. To me, food that tastes good is good food. This mentality guided me very well through life until I started learning how to cook. I have begun to appreciate why we must pay attention to presentation.

Creating something beautiful demands that you pay more attention to your cooking. I certainly started to pay more attention when I know that I have to plate the food nicely. The final display forces you to improve, to strive for the perfect texture and perfect doneness. It makes you observe more carefully, knowing that food doesn't just have to taste good but, just as importantly, it must appeal to all the senses. I know this because whenever I serve up beautifully plated dishes or have gone out of my way to make something extra special, my guests seem to enjoy their food slower and linger longer around the dinner table.

So here I present to you what I had for brunch today. Pancakes carefully molded into a Mickey Mouse shape served with bacon, maple syrup and orange juice. The pancake recipe is also one of my favorites. It produces the fluffiest lightest pancake. Try it. I am confident that your family will love it.


Pancake recipe

Dry Ingredients:
2 cups all purpose flour
¾ teaspoon baking soda
1/3 tablespoon salt (table salt is ok but I prefer sea salt)
1 tablespoon sugar

Wet ingredients:
2 eggs, separate into whites and yolks
2 cups buttermilk
4 tablespoon melted butter

Directions
1) Whisk egg whites with buttermilk in a bowl.
2) In another bowl, whisk the egg yolks with the melted butter until the mixture is pale yellow.
3) Combine the buttermilk mixture with the egg yolk mixture in a large mixing bowl and whisk together until combined. It is ok to leave the lumps in, you do not need to remove all the lumps!
4) Place Mickey pancake mould on a preheated non-stick pan. You can use a little cooking spray to grease the first pancake, but usually cooking pancakes don’t require grease or you’ll end up with oily and soggy pancakes.
5) Using a small teaspoon, drop 3 teaspoons of batter into the center of the mould and quickly spread from the center outwards.
6) Cook for 2 mins or until the bottom has set, then flip the pancake. Cook again for 1 min and release from mould.

Makes 12 Mickey Mouse Pancakes.

Sources:
Mickey Mouse Pancake Mould is no longer available on the Disney online store but it is available here:
http://www.treasurekingdom.com/DT/008DLHMMm.html

More specialty baking items also available on:

http://www.biodiversityherbs.com

Have a great week ahead!

-Julie

Sunday, March 1, 2009

Trophy cupcakes-In Seattle

I love eating cupcakes from Trophy Cupcakes and Party. They are always moist with a crispy top. The cupcakes also have a round "lip", as a result from overfilling the muffin tin and letting the batter overflow during the baking process. The buttercream icing is so heavenly and smooth. When I like to eat something, I will try to duplicate the item at home so that I can enjoy it more often and share it with others. The extra effort you put into making something yourself is the secret ingredient for all delicious food because it comes from the heart. So here I share with you one of my favorite cupcake recipe.


Enjoying my Saturday morning with a cupcake and a cup of tea


Cupckes from Trophy Cupcakes and Party (Seattle)

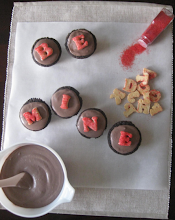
I have also added the sugar cookie dough alphabet letters cookie so that you can spell out any captions for any special occasion....Father's day, mother's day, birthdays, Valentines day and 4th of July, the possibilities are endless. This little "special touch" will make your cupcakes extra special. I hope you enjoy it.

Cupcake Recipe (For a delicious moist cupcake)

(Recipe from Better Homes and Gardens, Feb 2009)

Ingredients:
3/4 cup plus 1 tsp all purpose flour
1/3 cup plus 1 tsp unsweetened cocoa powder
1 tsp baking powder
1/2 tsp baking soda
1/4 tsp salt
1/3 cup unsalted butter, softened
3/4 cup sugar
2 eggs
1 tsp vanilla
1/2 cup sour cream

1) Preheat oven to 350 F.
2) In a bowl combine 3/4 cup flour, 1/3 cup cocoa powder, baking powder, baking soda, cinnamon, and salt, set aside.
3) In a large bowl with electric mixer beat butter on medium to high for 30 seconds. Add in sugar, beat until smooth and fluffy.
4) Beat in eggs and vanilla until smooth.
5) Beat in sour cream and flour mixture.
6) Line sixteen 2 1/2 inch muffin cups with paper bake cups. Fill each cup with two slightly rounded tablespoons of cake batter.
7) Bake 18 mins or until top springs back and cool completely on wire rack.
8) Top each cupcake with icing and top with Alphabet cookies.

Chocolate Icing

Ingredients
1 1/2 cup powdered sugar
8 ounce carton sour cream
1 cup whipping cream
1 1/2 cup powdered sugar
1/4 cup unsweetened cocoa powder

1) In a large mixing bowl, combine one 8 ounce carton sour cream, 1 cup whipping cream, 1 1/2 cups powdered sugar and 1/4 cup sifted unsweetened coca powder. Beat on medium-high until fluffy.

Alphabet cookies (For decoration)

1) On a lightly floured surface, knead 1/3 cup all purpose flour into 1/2 of a 16.5 ounce package of refrigerated sugar cookie dough (You can use any basic sugar cookie recipe and just knead in the extra flour so that the cookie will hold it's shape better).
2) Roll dough out to 1/4 inch thick
3) *KEY STEP* Lightly brush with water and sprinkle with coarse red sugar
4) Cut into cookies into your desired spelling.
5) Bake small cookies in preheated 375 F oven for 6 minutes. Bake larger cookies 7 to 8 minutes.
6) Cool onto wire rack and use it to decorate your cupcakes.

Cupcakes I made for Valentine's day

You can purchase these beautiful cookie cutters here:

http://biodiversityherbs.com/products/cookiecutters/alphabetcookiecutters.html

I hope you will continue to make this delicious snack for your family for years to come!

Kind regards,
Julie for Biodiversity Herbs